Administrator documentation
Running the demo
A demo using with pre-loaded data is available for local execution. It comes with various accounts from regular user to superuser. To run locally this instance you need to have docker installed on your computer, then run docker run -d -p 127.0.0.1:8086:8086/tcp viralhostrangedb/demo and then open in your browser http://127.0.0.1:8086. Here after are detailed the accounts, and their ability.
Reminder: Once the demo stop all changes made to the demo disappears, ensuring you to always start a consistent demo instance.
- Root
- username: rootpassword: rootrootdescription: This user is a superuser and a curator. It can explore the admin interface of the application.
- Admin
- username: adminpassword: adminadmindescription: This user is a staff and an admin. It can create new users (but cannot edit users), and make define a user as curator.
- Curator
- Alice
- username: alicepassword: alicealicedescription: This user is a regular user, owner of the public data source alice data source which is shared with user bob, with edition permission.
- Bob
- username: bobpassword: bobbobdescription: This user is a regular user, it can see and edit the data source alice data source. This user also have a public data source bob data, and a private data source secret data of Bob
Fetching the latest demo
If you executed in the past the demo on your computer and you want to be sure that you run the most recent version, you should run docker pull viralhostrangedb/demo before executing docker run -d -p 127.0.0.1:8086:8086/tcp viralhostrangedb/demo. The docker pull ... compares the image you have on the computer to the latest image in the repository, and download only the new layers to have an up-to-date image.
Stopping the demo
The demo is running as long as you do not restart the computer. Run docker kill $(docker ps --filter "ancestor=viralhostrangedb/demo" -q) to stop the demo. When the demo stopped, all changes made to the demo are lost permanently, ensuring you to always have a clean demo instance.
Building the demo locally
export VHRDB_SRC=$(pwd)/viralhostrangedb
# get latest sources
git clone https://gitlab.pasteur.fr/hub/viralhostrangedb $VHRDB_SRC
# go to the source home
cd $VHRDB_SRC/src/viralhostrange/
# build the base image, the one running in the public instance
docker build . -t base_vhrdb
# replace $CI_REGISTRY_IMAGE:$CI_COMMIT_SHA by base_vhrdb as the base image has been built locally
cat demo.Dockerfile | sed 's/\$CI_REGISTRY_IMAGE:\$CI_COMMIT_SHA/base_vhrdb/g' | docker build . -t demo -f -
# run the demo
docker run -d -p 127.0.0.1:8086:8086 demo
# you now can open http://127.0.0.1:8086 in your browser
xdg-open http://127.0.0.1:8086
Deploying a local instance
Architecture
The architecture is designed to run on a kubernetes cluster. The public instance running at https://viralhostrangedb.pasteur.cloud/ is automatically deployed with the continuous deployment of gitlab. Procedure to deploy an instance can be seen in .gitlab-ci.yml. Several environment variable are needed and are detailed hereafter :
- DEPLOY_TOKEN
Let the CI/CD access to your local docker registry to push the images
- DEPLOY_USER
Same as DEPLOY_TOKEN
- NCBI_API_KEY
Querying the Entrez API of the NCBI in order to determine if identifier are valid in the NCBI(cf e-utilities)
- NCBI_EMAIL
Same as NCBI_API_KEY
- POSTGRES_PASSWORD
The password that will be associated to the postgres user used by the application.
- SECRET_KEY
Needed by django (cf here)
- USE_SQLITE_AS_DB
Indicate to not use SQLITE, but POSTGRES instead. Must be set to False for a production instance.
What to do first
Once deployed, the application will initialize the database and then make the instance up and running. At this point there is no superuser user. As owner of this instance you have to access to your ViralHostRangeDB instance in a web browser and create an account. The first user to create an account become superuser, and also skip the part where the email have to be validated before enabling the account.
Manage a local instance
Superuser: Great power great responsibility
Your are a manager of the instance, you might also be a regular user or curator of the application. It is highly recommended to not use the superuser account for your user/curator work: use the superuser account for administration works, and use your regular account for browsing, contributing and curating. This division of responsibility in two account reduces the chances of the application being compromised with, for example, a superuser session forgotten opened in a browser.
Permissions of a superuser
Create user
Change first and last name of users
Make a user an Admin and/or a curator
Delete a user, but only if there is no data source associated. Keep in mind that it will also delete change entries associated to the user (cf. History of data sources, and backup policy).
Defining an user as curator
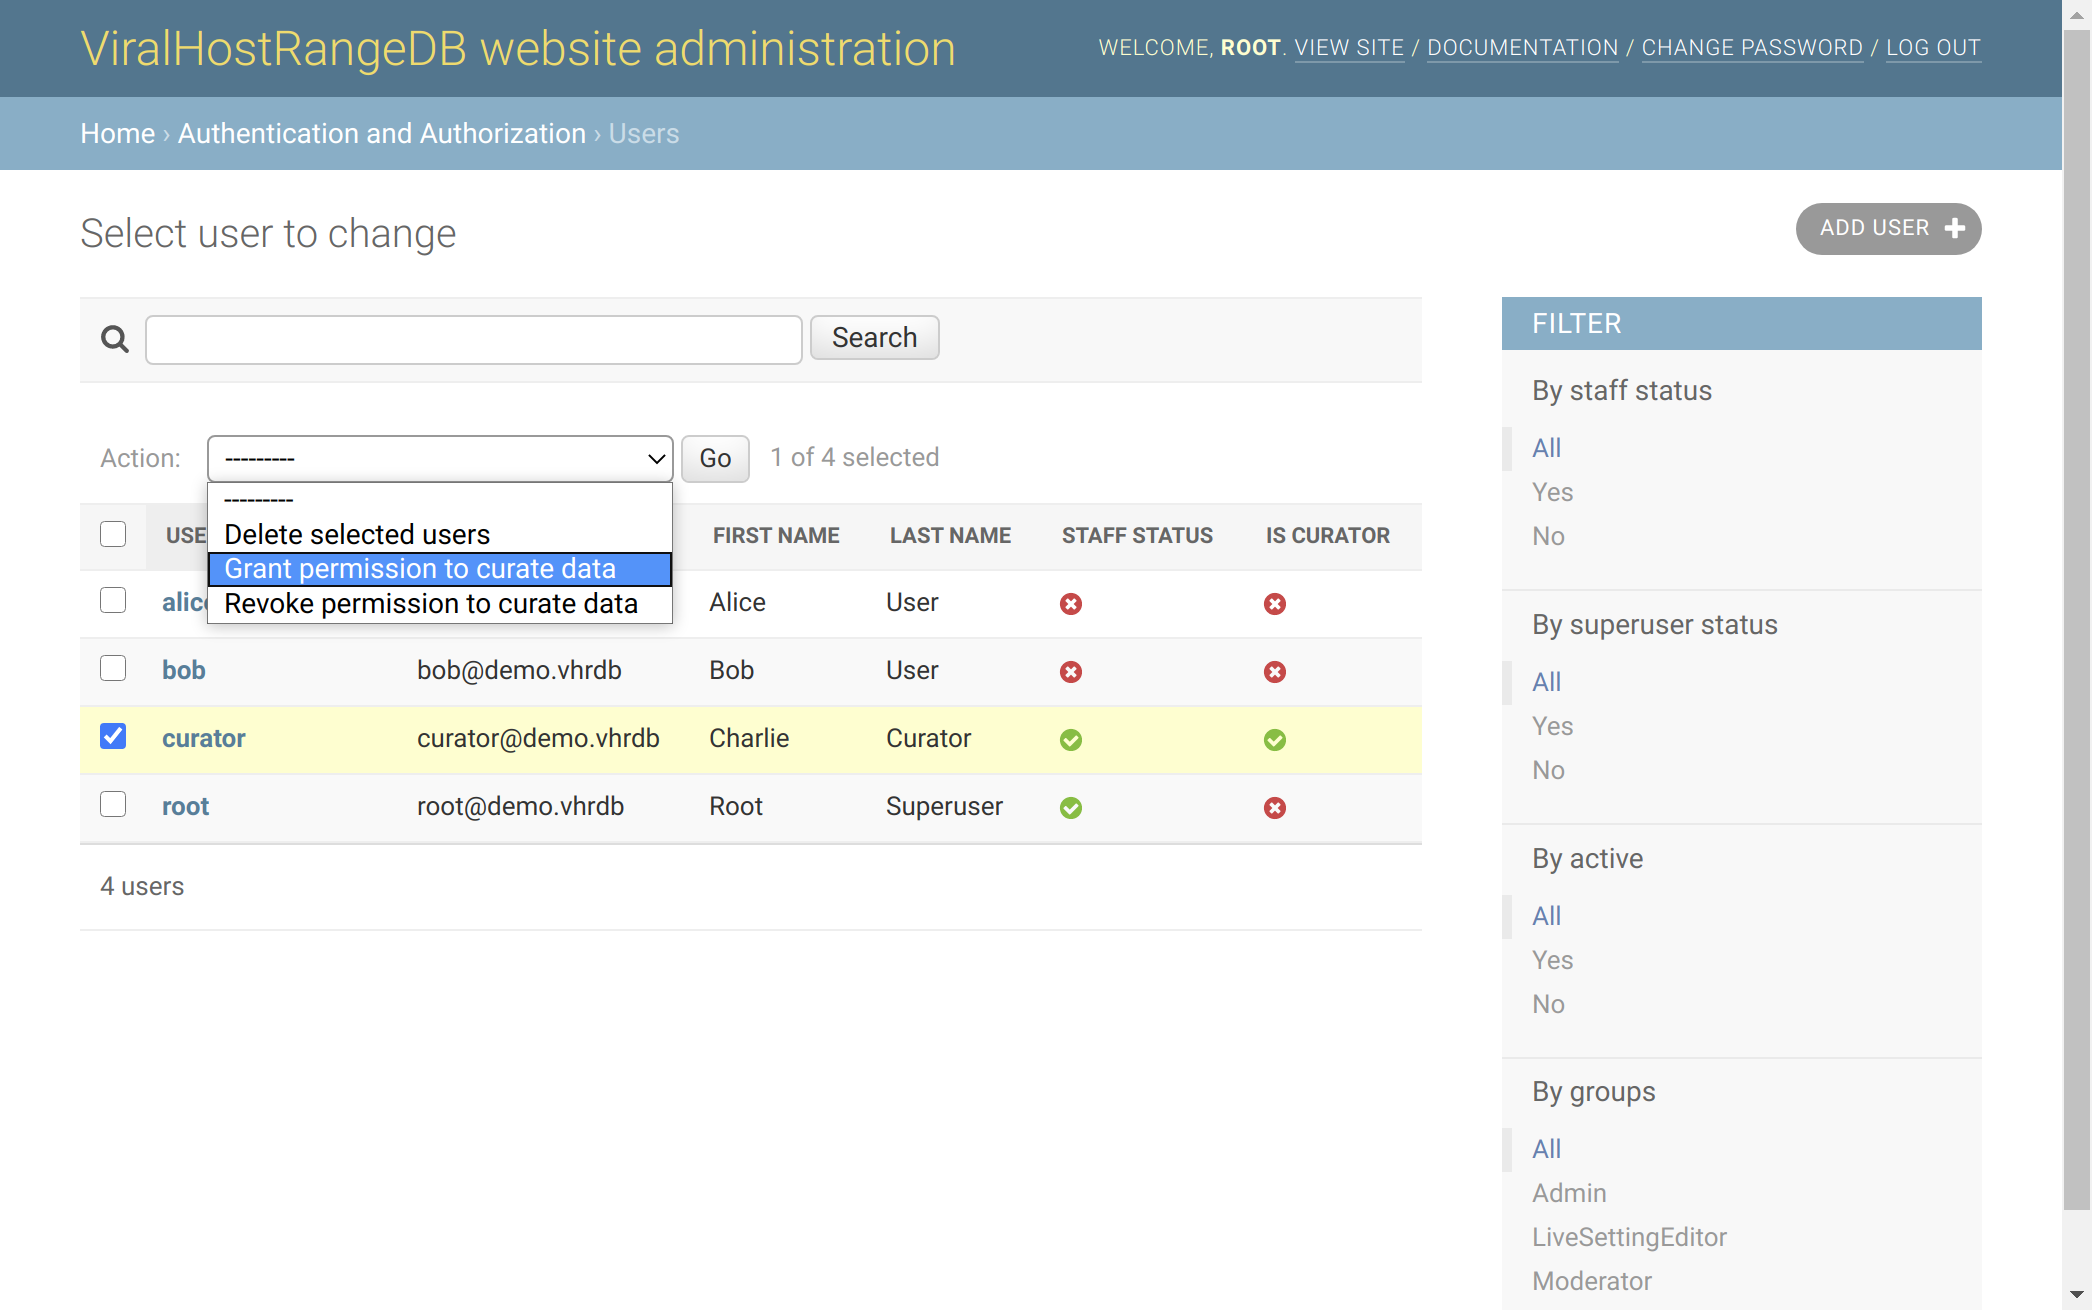
To do so, do to the admin interface https://viralhostrangedb.pasteur.cloud/admin/auth/user/, select the user you want to add/remove from the curators, and use action “Grant permission to curate data” or “Revoke permission to curate data”. Note that curators are listed in https://viralhostrangedb.pasteur.cloud/about/. Only superuser can define a user as curator.
Defining an user as “staff”, and member of one or more groups
Defining a user as staff does not provide any permission by itself. You have to put this user in a group to give some permissions.
- Group
Admin Defining a user as staff and member of the group
Adminallows this user to:create user.
edit user first name and last name of users.
see permissions associated to users.
edit the curator status of a user
It does not allows a staff ``Admin`` to change nor delete user.
- Group
Moderator, becoming a curator Defining a user as staff and curator (member of the group
Moderator) does not give more permission than being a curator.It does not allows a staff curator to view responses (neither public, shared or private).
- Group
LiveSettingEditor Defining a user as staff and member of the group LiveSettingEditor allows this user to alter values stored in the live_settings. Here are the variables stored, and editable:
number_of_recent_data_sourceThe number of data source to show in the homepage, by default 4 are rendered.enable_meta_analysisRender two button at the end of the homepage with allows to either show or download all the responses (that we can see) associated with identified virus and hosts.log_entry_up_toSummary of changes are periodically sent (see here for details). We store inlog_entry_up_tothe primary key of the last event(change, deletion) for which the email have been sent. Changing this variable can make some event not notified, or re-notified.
Account creation
Account creation is normally a task you do not have to do. When a user starts its account creation, the account is created but disabled, and is member of the group PendingAccountUser. The user receive an email in its mailbox with a link. Following this link will enable the account and remove the account from the group PendingAccountUser.
If you want to create an account for someone else, we recommend you to create the account from the admin interface, define a random password that you immediately forget, and ask the user to reset its password. This use case is useful when you want to grant permission to a user on a data source when (s)he does not have yet account in ViralHostRangeDB.