Ask for your project to be able to deploy to Kubernetes cluster(s)
Note
shiny-k8s-example gitlab project is dedicated to user like you, and herits all files from another gitlab project named shiny-k8sshiny-k8s-example complete or replace files, values, parameters defined in shiny-k8s.shiny-k8s-example project contains only files, values and parameters you need to adapt to your shiny app.Now you have a GitLab project, you should now consider who will use your application, only users inside pasteur (with VPN), or maybe others, and how much resources are needed.
Dev ? Prod ? What environement do I need?
On the dev cluster, urls to access to application are shaped as https://<anything>.dev.pasteur.cloud. These urls are also only accessible within the Institut Pasteur or with the VPN.
On the prod cluster, you can have urls https://<anything>.pasteur.cloud, and they can be only accessible to the Institut Pasteur or with the VPN, or opened to the world.
By default you are granted to deploy into dev, but if you ask you can also deploy into prod.
Do I want a public URL accessible without the VPN?
If you want to have an URL accessible by anyone without the VPN, you have to deploy to the prod cluster, but you also have to declare this URL to the DSI.
What resources (CPU, RAM, storage) do I need?
Ressources should be estimated carefully. While asking and using for too few CPU will only slow down your application, asking for too few RAW will make your application unusable.
How memory overuse is handled by Kubernetes
Shiny-server start sub process to handle the page you are browsing, and to do
the associated computation. When the memory used is more than the value of
shiny-server.resources.limits.memory the sub process is killed by Kubernetes.
In the web browser you see a message indicating that “you have been
disconnected”.
Troubleshooting can be tricky as you will not see any message from shiny-server,
Kubernetes does not notify you of the process being killed, and in term of
Kubernetes object, the “pod” is not restarted [1].
How to observe my memory usage locally
To observe the memory consumption of your application, build it, start it, monitor it, when then use your application as you expecte it will be used. Use it multiple time in a row as shiny will keep some variable cached in memory
# Clean up all docker running on your computer
docker stop $(docker ps -aq)

# Start you application
docker-compose up --build -d

# Start watching
while true; do
    docker stats --no-stream | grep -v "CONTAINER ID" | tee -a shinylogs/stats.txt; sleep 1;
done
In the following example, we used the application, reloaded the page and re used it. In an actual use case, you should use it more than twice in order to have an acurate estimation of the memory consumption.
fca3d08757e1   rshiny-k8s-example-r_shiny-server_1   0.00%     35.47MiB / 31.09GiB   ...
fca3d08757e1   rshiny-k8s-example-r_shiny-server_1   17.30%    430.63MiB / 31.09GiB   ...
fca3d08757e1   rshiny-k8s-example-r_shiny-server_1   13.87%    920.30MiB / 31.09GiB   ...
fca3d08757e1   rshiny-k8s-example-r_shiny-server_1   44.62%    1.03GiB / 31.09GiB    ...
fca3d08757e1   rshiny-k8s-example-r_shiny-server_1   0.24%     230.99MiB / 31.09GiB   ...
fca3d08757e1   rshiny-k8s-example-r_shiny-server_1   22.60%    850.08MiB / 31.09GiB   ...
fca3d08757e1   rshiny-k8s-example-r_shiny-server_1   51.20%    1.31GiB / 31.09GiB    ...
The memory usage peaked up to 1.31Gi, maybe the memory went higher between two measures, maybe using it more than two times would have use more memory. Defnining the limit to 2Gi seems thus resonable. This value will have to be set in Adjusting resources.
How to estimate quota needs from your app ressources
In the following we will estimate a multiplication factor that have to be applied to your request and limits of memory and cpu of your application.
We will work on memory, but keep mind that the resoning is the same for memory and cpu, request and limits.
In the previous example, the memory peaked to 1.31Gi, and we defined that its RAM needs is 2Gi. We thus need at least this memory times one instance.
–> Quota memory limit >= \(2\text{Gi} * 1\)
Assuming you want to use Nodowntime, two instances will shortly consume resources at the same time, so you have to consider a second one is running.
–> Quota memory limit >= \(2\text{Gi} * (1 + (1 \text{ if }Nodowntime\text{ else } 0))\)
Assuming you want to use Autoscaling, with a maxReplicas: ...
it is not one but \(qte_{replicat}\) that will run in parallel.
–> Quota memory limit >= \(2\text{Gi} * (qte_{replicat} + (1 \text{ if }Nodowntime\text{ else } 0))\)
In dev you might want to have multiple version running in parallel, one for the main branch, one when developping a new feature, one stagging anther feature, … We thus introduce \(qte_{branch}\).
–> Quota memory limit >= \(2\text{Gi} * (qte_{replicat} + (1 \text{ if }Nodowntime\text{ else } 0)) * qte_{branch}\)
For example, with 3 branches, a maxReplicas to 2 and Nodowntime enabled, your multiplier is 9, you would need in the worst case scenario 18Gi.
Keep in mind that the limit is not what you will consume at any moment, it is just the allows peak of consumption. Most of the time you will use \(~100\text{Mi} * qte_{branch}\) [2].
Note
The multiplier is then \((qte_{replicat} + (1 \text{ if }Nodowntime\text{ else } 0)) * qte_{branch}\)
Dev vs Prod quota
In your dev environement multiple branches will coexiste, but autoscaling and nodowntime might not be that much relevant as you may accept to have an instance going down with a wrong commit, or a slowed down as you started multiple computation on it.
In you production environement you will have only one branch, the main
branch. But in production using nodowntime is adviced, and autoscaling
could also be a good idea if you may face peek of usage by numerous users.
Also dedicating more CPU and RAM to your app can make sens.
By re-using previous example, but after adapting settings after the previous discussion, we then have a quota needs of:
Memory limit |
Autoscaling |
No downtime |
Branches |
Multiplier |
Quota memory limit |
|
|---|---|---|---|---|---|---|
Dev |
2Gi |
1 |
no |
3 |
=3 |
6Gi |
Prod |
4Gi |
3 |
yes |
1 |
=4 |
16Gi |
Ask it!
You can ask the DSI on rocketchat - #Support Kubernetes, Gitlab, CI/CD channel. You can send an email to IT Support, but ask for this issue to be routed to OPSI (and not cluster team).
Here is a summary of the information to transmit :
Name of the application : My application
Project ID of Gitlab project (find it on the main page of your Gitlab project) : ######
Project in GitLab: https://gitlab.pasteur.fr/ada-team/my-project
Namespace in dev: my-project-dev
CPU quota in dev: <...> cpu
RAM quota in dev: <...> GiB
Disk quota in dev: <...> GiB
Namespace in prod (if needed): my-project-prod
CPU quota in prod (if needed): <...> cpu
RAM quota in prod (if needed): <...> GiB
Disk quota in prod: <...> GiB
Public URL in prod (if needed, the complete URL): https://my-project.pasteur.cloud.
Name(s) of person(s) who will administrate your application on Kubernetes : Project Manager Name, ...
Name(s) of person(s) who will get read only access on Kubernetes : Project Manager Name, ...
Name(s) of person(s) who would get notified (For alerting purpose) : Project Manager Name, ...
The DSI will configure your project so it can deploy to the different
Kubernetes clusters, and will indicate you the names of the namespaces.
You need these namespaces names to update your .gitlab-ci.yml
(See Adapte the CI to your project).
More information can be found in dsi-docs pasteur.
Adapte the CI to your project
In .gitlab-ci.yml, you have to update the value of the NAMESPACE
variables. In place of rshiny-dev use the *-dev namespace name the DSI
provided you.
Example:
 ...
 deploy-example:
     extends: .deploy
     variables:
-       NAMESPACE: "rshiny-dev"
+       NAMESPACE: "my-project-dev"
 ...
If you asked for a namespace in prod, with an url, uncomment the job
deploy-example-in-prod, and change the namespace rshiny-prod to
<your_ns>-prod.
Finally, if you selected a public url which is not my-project.pasteur.cloud,
then change the url.
 1## Deployment job for production
 2#deploy-example-in-prod:
 3#extends: .deploy
 4#only:
 5#    - main
 6#variables:
 7#    NAMESPACE: "rshiny-prod"
 8#    PUBLIC_URL: "${CI_PROJECT_NAME}.pasteur.cloud"
 9#    INGRESS_CLASS: "external"
10#    CHART_LOCATION: "chart"
11#    IMAGE: "${CI_REGISTRY_IMAGE}/${CI_COMMIT_REF_SLUG}:${CI_COMMIT_SHORT_SHA}"
12#    VALUES_OVERRIDE_FILENAME: "values.prod.yaml"
13#environment:
14#    name: "k8sprod-02/${NAMESPACE}/${CI_COMMIT_REF_SLUG}"
15#    url: "https://${CI_PROJECT_NAME}.pasteur.cloud"
16#before_script:
17#    - kubectl delete jobs -l app=kubeclarity-scanner
 1# Deployment job for production
 2deploy-example-in-prod:
 3extends: .deploy
 4only:
 5    - main
 6variables:
 7    NAMESPACE: "<your_ns>"
 8    PUBLIC_URL: "<your url>"
 9    INGRESS_CLASS: "external"
10    CHART_LOCATION: "chart"
11    IMAGE: "${CI_REGISTRY_IMAGE}/${CI_COMMIT_REF_SLUG}:${CI_COMMIT_SHORT_SHA}"
12    VALUES_OVERRIDE_FILENAME: "values.prod.yaml"
13environment:
14    name: "k8sprod-02/${NAMESPACE}/${CI_COMMIT_REF_SLUG}"
15    url: "https://<your url>"
16before_script:
17    - kubectl delete jobs -l app=kubeclarity-scanner
Note
If you want this URL to be accessible only to Pasterian, then you don’t have to ask the
DSI for this URL, and you have to set INGRESS_CLASS: "internal" (line 9)
Note
An full documentation on the CI is available at Gitlab CI of shiny-k8s-example.
Configuring your application in Kubernetes (values.yaml)
Even though the application is preconfigured to be up and running, you can adapt its behavior by overriding some variables. To do so set the variables you wish to change in chart/values.yaml.
Here are all the settings you may want to change
 1shiny-server:
 2    registry:
 3        private: false
 4    nodowntime:
 5        enabled: false
 6    autoscaling:
 7        enabled: false
 8        minReplicas: 1
 9        maxReplicas: 2
10        targetCPUUtilizationPercentage: 80
11        targetMemoryUtilizationPercentage: 80
12    resources:
13        requests:
14            memory: "256Mi"
15            cpu: "250m"
16        limits:
17            memory: "512Mi"
18            cpu: "1000m"
19    ingress:
20        annotations:
21            nginx.ingress.kubernetes.io/affinity: cookie
22            nginx.ingress.kubernetes.io/proxy-body-size: 256m
23    storage:
24        enabled: false
25        size: "1Gi"
26        className: "isilon" # could be ceph-block, incompatible with nodowntime
27        keepOnDelete: true # should be false in dev, true in prod
Private registry and deploy token
If the visibility’s project is private or internal, you need to set the project as private. Therefore, the registry containing the Docker image build from your sources.
1shiny-server:
2    registry:
3        private: true
1shiny-server:
2    registry:
3        private: false
By setting it to true, the helm package and associated CI scripts are expecting a DEPLOY_TOKEN and a DEPLOY_USER. See Define deploy token to do so.
Nodowntime
When a new version of your application is released, the old version is stopped, and the new one is then started. Between these two events, your application is not reachable. You can enable the nodowntime. If so, the new version will be started, and only when ready, the old version will be stopped down. Another advantage of nodowntime is that if the new version fails to start, the outdated version is still available.
The drawback of the nodowntime is that temporarily two version of the application are running, which both consume resources. You thus have to adjust the resources so the limits is at most half your quota (cf See quota and logs).
shiny-server:
    nodowntime:
        enabled: false
Autoscaling
If you plan to have spike of activity for your application, you may want to enable autoscaling. It will start new instance(s) of you application and will dispatch new users to the less used instance. Note that each instance started will consume resources, so keep an eye on your quota and your resources.
shiny-server:
    autoscaling:
        enabled: false
        minReplicas: 1
        maxReplicas: 2
        targetCPUUtilizationPercentage: 80
        targetMemoryUtilizationPercentage: 80
Adjusting resources
You can ask for more resources, keep in mind that these resources must be within your quota (See quota and logs). Follow How to observe my memory usage locally to evaluate how much memory you need, and also the quota you need.
shiny-server:
    resources:
        requests:
            memory: "256Mi"
            cpu: "250m"
        limits:
            memory: "2Gi"
            cpu: "1000m"
Ingress annotations
If your application accepts to receive file from the user, the proxy-body-size define the maximum size of such file.
shiny-server:
    ingress:
        annotations:
            nginx.ingress.kubernetes.io/affinity: cookie
            nginx.ingress.kubernetes.io/proxy-body-size: 256m
Storage
Note
This feature is in beta as of March 2024, and will be available in v0.7
By default, everything you write on the storage of your application is lost when your application restart or have an upgrade. You can have folders for a persistent storage :
/srv/shiny-server/www/persistenthere you can write data that are served to user such as images, csv, …/datathe content of this folder is only visible for your application, not end users.
shiny-server:
    storage:
        enabled: false
        size: "1Gi"
        className: "isilon" # could be ceph-block, incompatible with nodowntime
        keepOnDelete: true # should be false in dev, true in prod
The
sizeindicated is for the total of the two folders (i.e: it is not per folder). It can be increased later, but cannot be reduced.The
classNameallows to choose between disk storage (isilon) or flash storage (ceph-block) which is faster but incompatible with nodowntime: Storage using ceph-block cannot be mounted by multiple pod (i.e: multiple version of your application) which is precisly what does the nodowntime option.The
keepOnDeleteindicate whetherthe storage and its content should be kept after removing the application. In production you should set it totrueas user might want to be able to re-consult analysis results later without re-running their analysis. In dev you should set it tofalseas a new storage will be created for each new branch and you don’t want to let them use your quota when you will have merged the branch.
Tunning for the production instance
When running in production, you might want to increase ressources, and use
autoscaling and nodowntime. To apply custom settings only to prod, define
the default/dev settings in values.yaml, and define the production
settings in values.prod.yaml, they will be applied on top of
values.yaml. In the following example we increase the memory and cpu
limits, but keep the request.cpu and request.memory as they are
defined in values.yaml.
We also indicate that if storage is used, it should be kept even if the
application is removed.
shiny-server:
    autoscaling:
        enabled: true
    nodowntime:
        enabled: true
    resources:
        limits:
            cpu: '2000m'
            memory: '2Gi'
    storage:
        keepOnDelete: true # should be false in dev, true in prod
Access to logs and quota
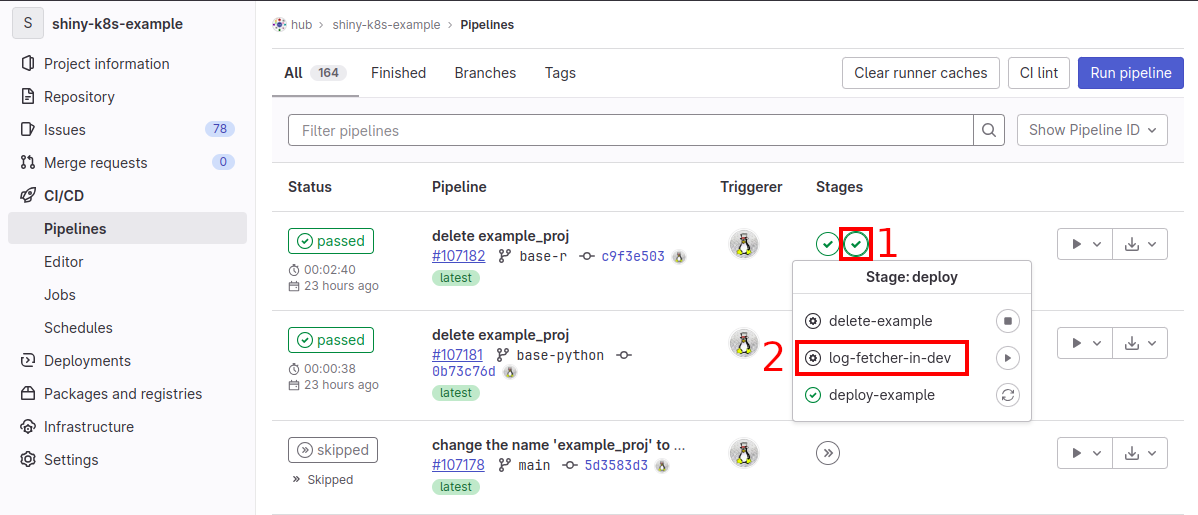
To access to the logs, you can either use the one-click CI job, or use Kubernetes utilities, we here describe the first one.
Go to Pipelines tab of your project at
https://gitlab.pasteur.fr/ada-team/my-project/-/pipelines
In the last pipelines, clic on the second round circle (1 in image), note
that it can be green, grey, red. Once openned the pipelines popup,
clic on the text log-fetcher-in-dev (2 in the image).

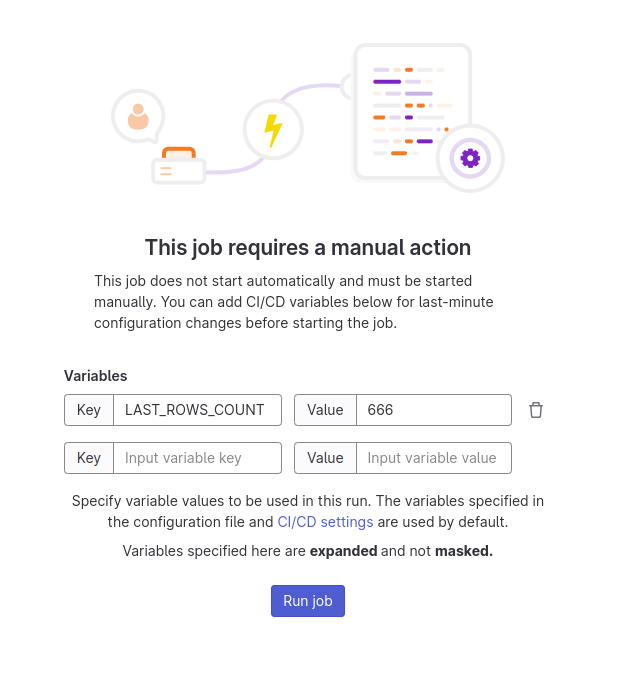
You can then either directly clic on Run job, you will see the last lines
(200 by default as of juky 2023).
You can also specify a custom amount of line, to do so specify the value
of the variable LAST_ROWS_COUNT. If you want all logs since startup
set the value to -1.
Which produce the following:

The logs will be at the bottom of the page (3 in the image). Here we see that the Shiny server has started well.
The quota will be at the beginning of the logs (2 in the image). Quota should be read as:
Kind |
Requests |
Limits |
Quota |
|---|---|---|---|
CPU |
0.5 |
1 |
2 |
Ram |
512Mi |
1Gi |
5Gi |
If you want to restart the task with a different number of rows, first you have to delete the log with the trash button at the top right of the page (1 in the image).